Summary
Call-to-action (CTA) buttons encourage further engagement from your visitors within your PathFactory experiences. CTAs can link to another URL, trigger a form, or send an email.
You create and manage all CTAs in one central llibrary, the CTA configuration screen, then apply them to your PathFactory experiences. The general process is to:
-
Create a CTA on the CTA configuration screen.
-
Update your Appearance groups with styling for CTAs.
-
Add the CTA to the PathFactory experience.
Any CTAs that use a link may also include PathFactory field merges to enhance any campaign tracking through query strings.
Navigate to CTAs
 Gear > CTAs.
From CTA configuration, you can:
- create new CTAs
- edit existing CTAs
- delete CTAs
- see where a CTA is applied
Create a new CTA
-
Select Add CTA.
-
Configure the CTA’s following fields (they are all required fields):
-
Name: this name only appears internally in your PathFactory instance
-
Button Label: the text that appears on the button (visible to visitors). Write a compelling, short phrase that motivates action.
NoteMaximum button label length is 18 characters. -
Type: select the destination type for the button click
-
Form: allows you to select from your existing forms in your Forms Library
-
Link: allows you to link to any valid external URL (including a content track, or even a PDF download)
-
Email: allows you to specify an email address to which the visitor’s email client will compose a message
-
-
Edit a CTA
You can edit existing CTAs from the CTA configuration screen.
- Select the CTA from the CTA configuration screen. A sidebar opens.
- Select each field in the sidebar to edit the CTA’s name, label, type, and/or destination.
- When you’re happy, select Save.
Delete a CTA
|
Warning
|
You can’t delete any CTA currently in use. If you try to delete a CTA which is in use, the warning modal will list where the CTA is. You must first remove the CTA from the listed PathFactory experiences, and then return to delete the CTA. |
-
Select the CTA from the CTA configuration page.
-
Select
 Trash in the bottom right corner.
 -
Select Delete CTA.
Use a CTA in a content track
Once you’ve created your CTA (and customized its Appearance) you can use it in a content track!
-
After adding your promoter and/or header, simply select CTA beneath the element you are adding a CTA to.
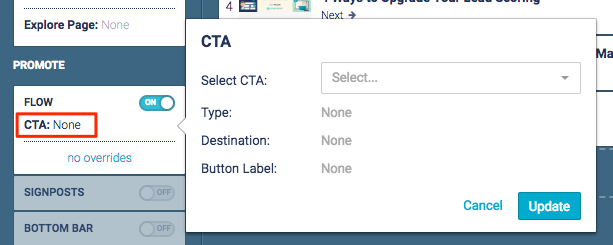
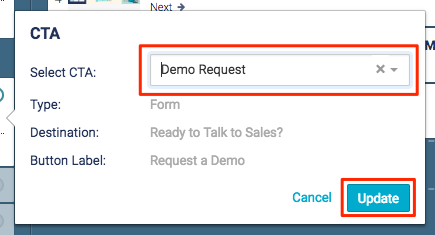
-
Select the CTA from the drop-down menu, and select Update to save.
-
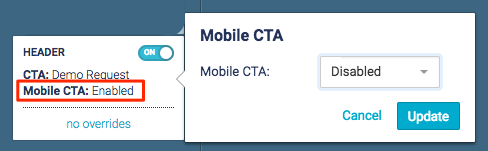
If you are using a CTA on your Header, you have the option of disabling the CTA for visitors accessing the content track on a mobile device.
View CTA analytics for content tracks
PathFactory tracks all visitor clicks on your CTAs. Analytics for these clicks are available within the content track analytics for any track which uses CTAs.
Where can I find CTA analytics?
What information do CTA analytics include?
-
Clicked On – The time and date stamp of when the visitor clicked on the CTA.
-
Visitor – The email of the visitor (if they are a known visitor), or the unique ID of the visitor (if they are unknown).
-
CTA Name – The name of the CTA which was clicked.
-
Clicked Content – The name of the content asset the visitor was viewing when they clicked the CTA.
-
CTA Type – The type of CTA (form, link, or email).
-
Promoter – The promoter type used in the Content Track.
|
Note
|
For more information on other analytics definitions, read this article on Target Track Analytics, or this article on Recommend Track Analytics. |
What about CTAs on forms?
While forms include a CTA button, these CTAs are created and edited when you create individual forms. Read Create a standard form for more information.
Customize CTA labels for Tracks, Explore pages, and Virtual Events
You can override the CTA label at the experience level for Recommend and Target tracks, Explore pages and Virtual Events, which allows you to reuse the same CTAs across different use cases without having to clone or create new CTAs.
Previously, the only option available was for you to clone the CTA or create multiple CTA using the same form as the destination but a different CTA label. Now your organization can repurpose the same CTA but use different button labels for different experiences!
To see how to use this new feature within your tracks, explore pages, and virtual events read on below.
Target and Recommend tracks, and Explore pages
- Navigate to the Target track or Explore page you want to edit.
- On the left panel, scroll down to the CTA section.
- To modify a CTA, select it. A popup menu appears.
CTA edit popup menu
- To Add a CTA, just click + Add CTA. The new undefined CTA appears in the CTA section. Select the new unnamed CTA to open the same popup menu as above. Here you can select the CTA you want to modify, and specify its look and navigation.
CTA edit popup menu

Virtual Events CTAs
- Open a Virtual Event. Select the Sessions tab to see all of the sessions associated with that event.
Sessions tab
- For the session you want to edit, click its corresponding Configure link.
To use this new CTA customization feature, you must select a session that has supplemental content, or else add the supplemental content when you get to the next step in this process. You can add the supplemental content on the Session Details tab by clicking + Add Content there.
Add Content button

- Ensure the toggle for CTA supplemental content is turned on.
Toggle for Supplemental Content - Next, customize the CTA label name, look and navigation by using the fields provided.
