Getting Started
A VEX event can contain as many sessions as you wish and sessions can be used for many different purposes. For example a session can be used for:
- Keynote/plenary presentations – One or more presenters to many attendees where audience participation is limited to things like chat, Q&A, and polling. Generally 100 or more attendees per session.
- Main Stage – one session running several hours of concurrent programming. In this scenario your video streaming service would typically cut between several video streams.
- Breakout sessions or hands-on labs – Sessions which allow for some audience participation via sharing their mic, camera, or screen.
- Sponsored sessions – A session delivered by a sponsoring company, and can include some sponsor branding and materials
- Sponsor virtual “booths” – A virtual booth where a sponsoring company can be available to talk via embedded meeting (such as Zoom or WebEx), or can use a pre-recorded demo or explainer video, with complementary product content.
- “Birds of a feather” discussions – A session can be positioned as a “birds of a feather” discussion room, where the live sesion is a videoconference. Attendees can turn on their mic and camera to participate in a conversation. This can include chat as well.
- Lounge – A session can be configured to run live for a long period of time (e.g. throughout the event), and configured with a WebEx or Zoom meeting so that attendees can drop in and participate in open discussions within the “lounge”.
Note: When creating a session, it will be tied to the event it is created within. A session cannot be transferred to another event and cannot be displayed as a session within another event.
Creating a VEX Session
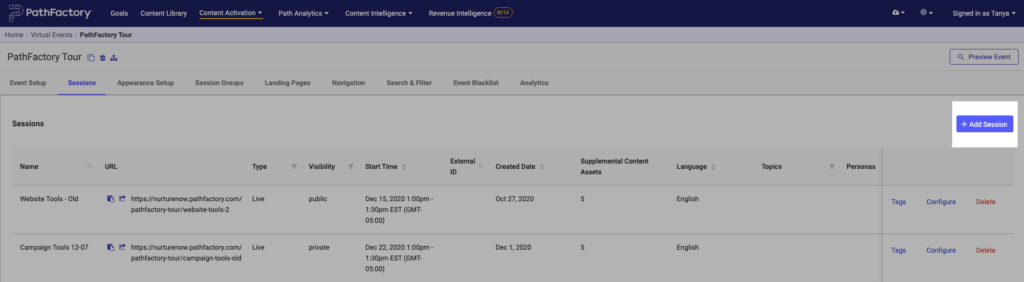
To create a session within your event, select your Virtual Event from the master list. Then, click the Sessions tab. Click the +Add Session button.
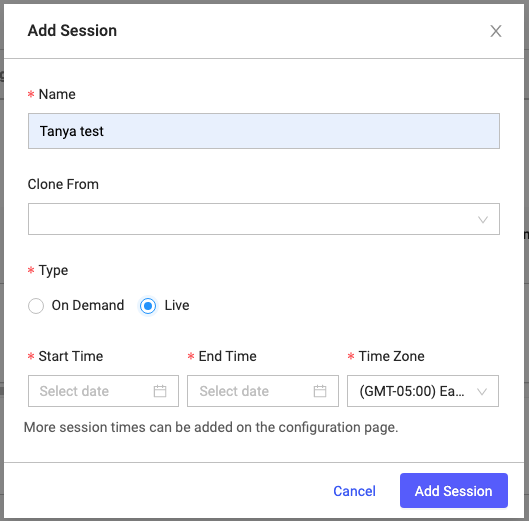
A window will appear requiring a name for your session. Here you also specify which type you are adding: On Demand or Live. It’s important that you choose a meaningful session name because your end users will see this title. If you choose Live, a Start Time, End Time and Time Zone are required. The default Time Zone is the one you’ve set within your Organization Settings.
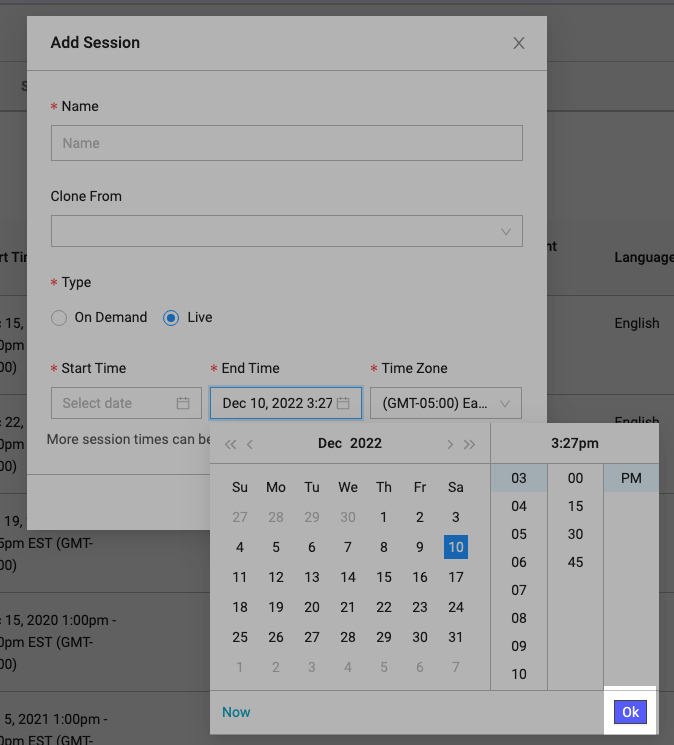
When choosing the session’s Start Time and End Time, if you use the included date/time picker you must press ‘Ok’ for your selection to take effect (as shown below). You can also edit your date/time selection by editing the text in these fields.
The Session Name, Type, Start Time, End Time, and Time Zone can all be changed after creating your session.
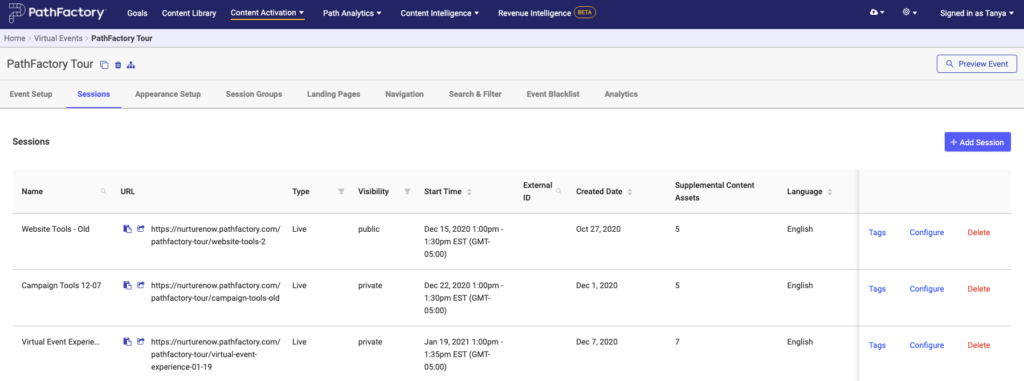
When you’ve entered the session information in the window, click the Add Session button (highlighted above). our session is then added to the session list in the Event Setup tab (highlighted below). You’ll notice an automatically generated URL has been created for your session, allowing you the option to send attendees directly to a session. This can be changed in the Session configuration (see Configuration below). Your session will not yet be visible to attendees (it’s visibility is set to private by default). In the session list you can then click the Configure link to configure your session (see Configuration below).
If you wish to delete a session from your event, locate the session you want to delete, and then click its corresponding Delete link. This will permanently delete the session. Once deleted a session cannot be recovered.

Configuring a VEX Session
Session configuration determines all aspects of how a session is listed and displayed. Beginning with the Sessions tab, this article explains how each setting controls your event. Find the session you want to configure, and then click its corresponding Configure link.
The Session Details tab opens.
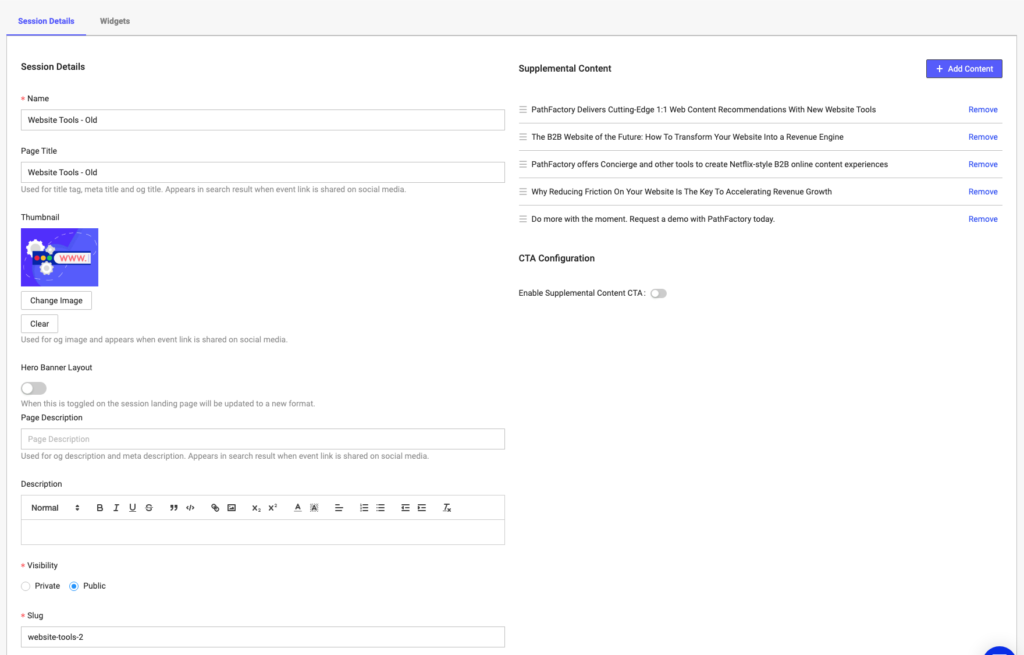
Session Name – is used in several places within your event. Most importantly it is displayed as the title of the session within the tile on the Event Page and as the title text below the video stream within the session itself.
Page title – Here you enter a descriptive title for your session. This title will be seen by your attendees.
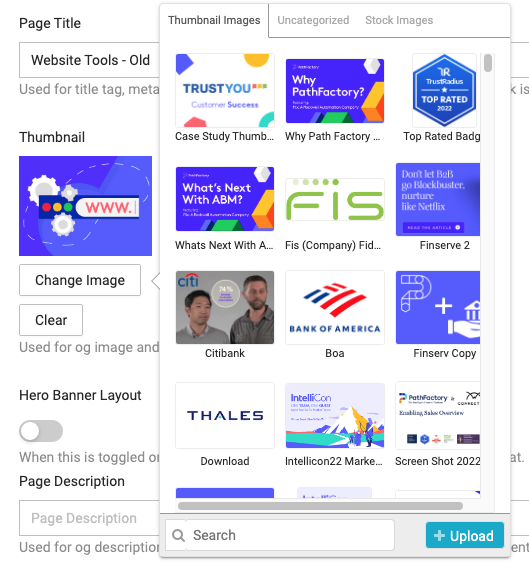
Thumbnail – The Session Thumbnail you choose should reflect the session content. It is displayed within the session tile on the event home page, and also in the session waiting room page (when a live session that has not yet started is clicked). If you do not choose a thumbnail image our default image will be used.
Recommended dimensions for thumbnail images are 400px x 300px. To add a thumbnail click the Add Image button. This launches an image picker where you choose an existing thumbnail from your image library or upload a new one. You can change an image at any time by clicking on the Change Image button. You can also clear your selection, which will return the thumbnail to default.
Hero Banner Layout – The hero section appears at the top of your session, and can be used to display a title, description, and background image or color.
Page Description – Here you enter a succinct description of the session.
Description – The session description is a text/HTML field where you can enter pertinent information about the session. The most common uses for this field are session description and speaker information (eg. their name, title, and bio). It is strongly recommended that all of your sessions have descriptions as they are very visible and provide your attendees with contextually relevant information. This text is displayed to your attendees in two important locations:
- When in a session they see it below the session title.
- When in the session waiting room (if a session has not yet started or the session has reached maximum attendance). For more information see the information on Live sessions below.
Visibility – If set to private (default) the session will not appear on the Event Home Page as a tile and the URL of the session will not be accessible. If anyone attempts to access the URL of a session while it is set to private they will be sent to the PathFactory 404 page or whichever fallback destination you’ve configured within your PathFactory Organization Settings.
Slug – This is used to generate the URL of the session. The URL of the session will follow the following format //. For example nurturenow.pathfactory.com/my-virtual-event/session-1. You can send attendees directly to a session by linking to the session’s unique URL. For more information see Registration and Sending Attendees to VEX.
Scroll down the tab a little further, and you see more parameters for you to customize your session.
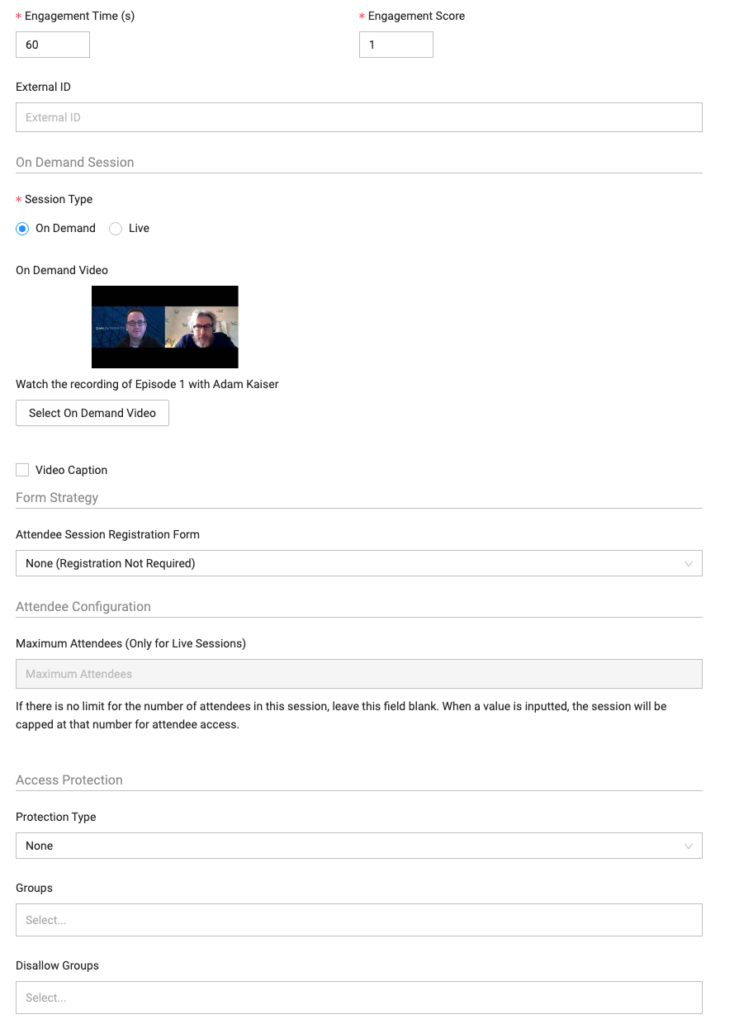
Engagement Time & Engagement Score – Regardless of whether the live or on-demand video chosen for your session is from your Content Library (where assets can have a time threshold and engagement score set), or uses Zoom or WebEx for live content, we will use the Engagement Time & Engagement Score you define in these fields for your session. These are used in our analytics and integrations to convey the quality of an attendee’s engagement with your session based on the time they spend on it.
Engagement Time is a time threshold (in seconds) you set for each session. The concept is this should represent the amount of time you feel represents adequate engagement. While our analytics and integrations will indicate when an attendee has met a threshold for a session, you can still see attendees who entered the session, but did not meet this threshold. For example if the engagement time is 120 seconds and an attendee spends 5 minutes on my session, the session will be included in that contact’s engagement data passed to your marketing automation platform. Alternatively, if an attendee spends only 20 seconds you will see that they accessed the session but you will not see the threshold as having been met for the session. The default value for engagement time is 60 seconds.
Engagement Score is a proprietary score to PathFactory. When an attendee meets the Engagement Time threshold (see above) for your session the engagement score you’ve entered for the session will be applied to the attendee. This is displayed within our analytics as Engaged Intent and is included in our integrations (for example in our Session Closed Webhook in the Engagement Score field). This score is incremented each time the attendee meets an engagement threshold. This score can be used in numerous ways such as scoring event attendees, adding attendees to campaigns, or including attendees in relevant nurturing programs.
Live / On Demand Toggle – This toggle allows you to change an event from On Demand to Live or vice versa.
On Demand Video – Choosing an On Demand video is not required but important to ensure attendees receive a smooth experience after a session ends. For more information on what happens after a session see the section on After a Session Ends above.
Sessions that are set to On Demand simply pull one video in from your Content Library as the primary video stream. In order to save your session you must choose an On Demand video. Do so by clicking the ‘Select On Demand Video’ button. This will produce a window allowing you to choose any content library video.

To learn more about adding content to your content library see Adding Content.
Note: this content picker is designed to restrict you to only choosing video content. It will only display content PathFactory automatically recognizes as video because it is hosted on a common video hosting platform, or if you have explicitly tagged it with the Content Type: ‘Video’. If you know your video is in your Content Library, but it does not appear in the picker, then ensure it is tagged to the Content Type ‘Video’ in your Content Library.
By making a session On Demand, the session is visible and can be attended by any event attendee at any time.
Live
Setting your session to Live provides the following additional options.
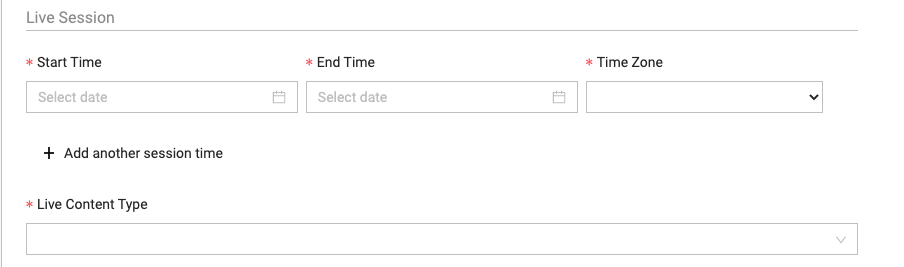
If you had set the session to Live when you created it, then you’ll see the Start Time, End Time and Time Zone are already set. For more information on how to enter the Session Start Time, End Time and Time Zone see the Creating a Session section above.
It’s important to understand what will happen before, during and after your session (as defined by the Start Time and End Time you enter)
To learn more about adding content to your content library see Adding Content.
Note: this content picker is designed to restrict you to only choosing video content. It will only display content PathFactory automatically recognizes as video because it is hosted on a common video hosting platform, or if you have explicitly tagged it with the Content Type: ‘Video’. If you know your video is in your Content Library, but does not appear in the picker, then ensure it is tagged to the Content Type ‘Video’ in your Content Library.
Before your session begins, the session is visible on your Event Home Page as a tile and within the agenda view. If an attendee clicks on a session or accesses it directly via URL before your session begins they will be taken to the session waiting room which includes the session Title, Description, Thumbnail, Start & End Time, and a countdown timer. This waiting room will automatically refresh and switch to the session view at the Start Time.
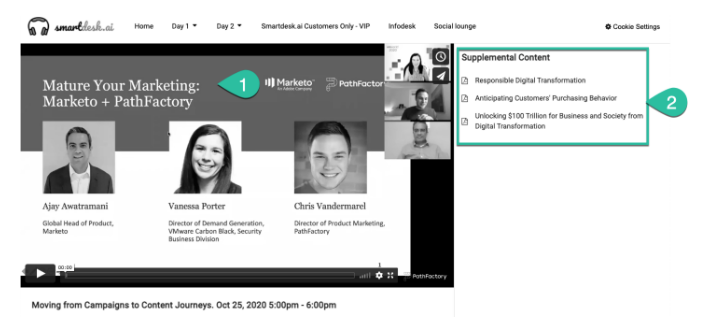
If an attendee clicks on a session or accesses it directly via URL during the session they’ll be taken to the standard session view, where they can see the video stream, title, description, Supplemental Content, and any widgets you’ve configured.
If an attendee clicks on a session tile or accesses directly via URL it after the session, what they see depends on whether you’ve selected an On Demand video. If you do not select an On Demand Video then the session will no longer be accessible after the session end time. The tile will no longer appear on your event page, and if an attendee attempts to access it by URL, it will not load. Because of this we recommend you always choose an On Demand video if possible because in doing so your session will still be accessible after the end time and the On Demand version will automatically be used. Many live video streaming services automatically convert a live stream to an on demand video after the stream stops, meaning you can choose the same video from your content library for both the Live Stream and the On Demand Stream.
If you are using a webinar or video conferencing tool like Zoom or WebEx, you will typically need to record the session in the video conferencing tool, download it your your computer as a video file, upload it to a video streaming service (like YouTube or Vimeo), add it to your content library, and choose it as the On Demand version of your session. If you are concerned about the session being unavailable during that time, we recommend having a placeholder video available stating “The recording will be available soon”. When your recording is ready, you can switch out the placeholder for the recorded On Demand video on your session.
Note: If an attendee is in a live session while it is live and the end time passes, the session automatically transitions to the on-demand video. Be sure to build extra time between the end time you set on your session and when you expect your presenter will actually finish the live presentation to avoid being abruptly cut off.
Live Content Type – This field allows you to choose from three different options for how the video stream of your live session will be handled; Zoom, WebEx, or Content Library. For more information on how to decide which technology to use to power your video stream see Choosing how to power your VEX session video feed.
Zoom – For more information see PathFactory VEX – Zoom Integration.
WebEx – For more information see PathFactory VEX – WebEx Integration.
Content Library – Choosing this option allows you to choose any video from your Content Library to be displayed when your session is live (ie. the current time is between the start time and the end time of the session). If your session is set to public, then you must choose a video and cannot save your session unless you choose a video from the Content Library. This ensures your live session has a video ready when it becomes live. You can use pre-recorded videos hosted on any video streaming tool, a live video stream on any video streaming tool, or other video conferencing tools that allow themselves to be iframed into a Web Browser (such as GoToWebinar or BlueJeans).
To select a Live Video click the ‘Select Live Video’ button. This triggers a window where you can choose any video from your content library.

Maximum Attendees – The Maximum Attendees field allows you to cap the attendance of your session to a fixed number of attendees at a given time. This setting only applies to Live sessions. On Demand sessions cannot have their attendance capped. If an attendee attempts to access a session that is full they’ll stay in the waiting room and see this message:
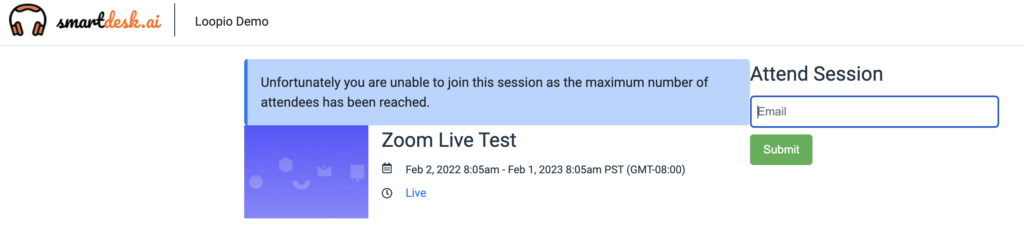
The text of this message will inherit the styling of your session (inherited from the Target – Flow appearance setting selected for your event). The background blue box can be updated with a global external code snippet targeting the css class. Please reach out to your Solutions Architect if you need help updating this external code.
If you do not wish to cap the attendance to a session, leave this field blank.
Cloning a VEX Event Including its VEX Sessions
If you are creating more than one similar VEX event, you can clone an existing VEX event, to prevent you from having to start from scratch. To clone a VEX event, follow these steps.
- Open VEX and begin to create a new VEX event by clicking Add Virtual Event.

List of Virtual Events - A configuration menu pops up. Enter a name for your new event. To clone a VEX event, in the Clone From dropdown list, select the event you want to copy.

Add Virtual Event menu empty - After you have chosen a VEX event for cloning, the menu updates with new options. You may clone any of the items listed by selecting each checkbox. If an item is grayed out, it doesn’t exist in the original VEX event and so cannot be copied.

Add Virtual Event menu - Select a folder in which you want to store the event by selecting an option from the dropdown menu.
- If you are ready to save, click Add Virtual Event. To close the menu without saving, click Cancel.
- You will see the newly created VEX event in the main list of events.
Supplemental Content
To control the Supplemental Content associated with a session, in the Session Tab, on the right side you’ll notice the Supplemental Content area. To add content as supplemental to the session click + Add Content.

Clicking this button produces a window which allows you to select content as supplemental to the session. The content in this window is restricted to non-video content (PDF, image, or webpage), and is chosen from your PathFactory Content Library. To learn more about adding content to your Content Library see Adding Content. When you’ve chosen supplemental content for your session click Add Content in the window (you can always add more later).
The content you’ve added can then be reordered using the handles to the left of each asset. Clicking the Remove button deletes the content asset from the VEX session, however the content asset is not deleted from the Content Library.
After adding the content you wish to associate with your session, and ordering it in the way you want it to show up, save your session for your changes to take effect. You’ll then see your Supplemental Content appear in the right side bar of your session when you visit your session as an attendee. When an asset is clicked by your attendees they’ll see it in a picture-in-picture view, allowing them to continue to watch the video stream while browsing the supplemental content.
Manipulating Session Look and Feel
The look and feel of your session is predominantly driven from the appearance settings you’ve chosen for your event. This includes your session header, and the fonts and font colors. To learn more about configuring appearance settings see VEX Appearance Setup.
If you wish to manipulate any aspect of your session using functionality outside of the options outlined above, there is not yet a way to tie a specific snippet of external code to a session. However external code applied globally will apply to your sessions and can be used to target specific elements of your session. For example each session has uniquely generated classes so that a snippet of global external code can target them individually.