Described below are two nurture strategies that allow you to augment traditional Eloqua nurture campaigns with PathFactory engagement data.
The first approach describes how PathFactory engagement data can be used to automatically skip sending nurture emails containing links to assets that have already been viewed by recipients. This approach is suitable for nurture campaigns in which you can put together all pieces of online content you intend on sharing with recipients in one single content track.
Determining Which Emails to Send Depending on PathFactory Engagement Data
Let us first examine a typical Eloqua nurture campaign flow: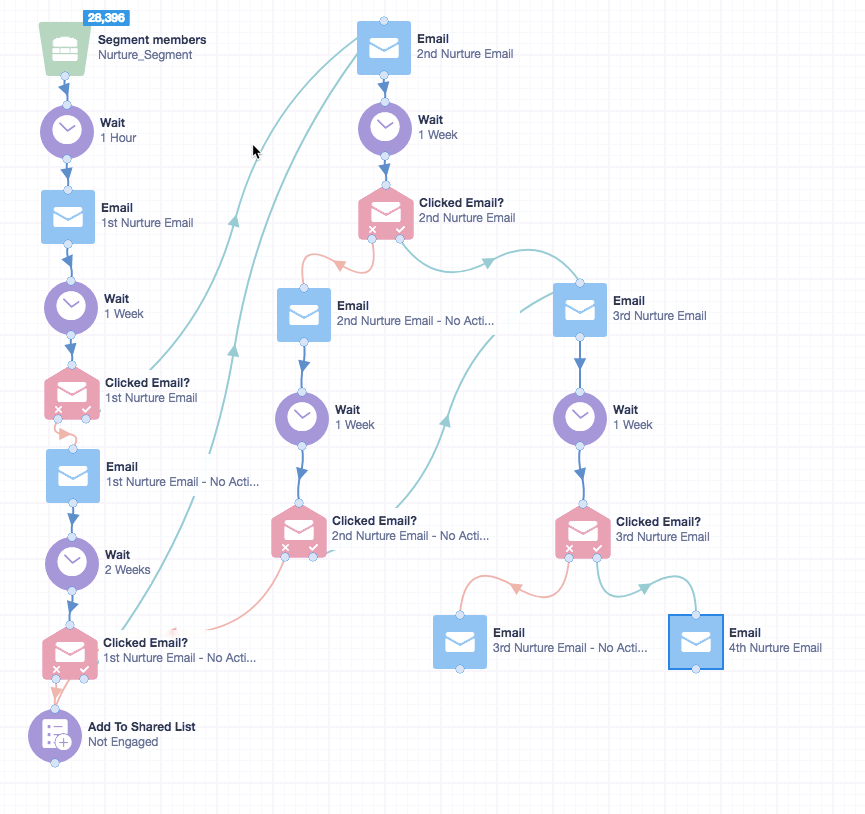
Eloqua Campaign Flow
The above is a snapshot of a Nurture campaign template available in Eloqua best practices campaign templates.
While your nurture campaign might deviate from the flow shown above, the main elements of an Eloqua nurture campaign remain the same:
- An initial email gets sent out to campaign members. Usually, the email CTA will point to a single piece of content. As such, there is a 1:1 relationship between the click and the number of assets a visitor sees after the click.
- Contacts are then evaluated to determine their level of engagement with the email sent. In Eloqua, this usually means checking to see whether contacts have clicked on the email.
- Contacts are then either sent the next email with a link to a new asset or will be sent an email with a CTA linking to the same asset in the first email but with a different email copy.
- The flow for the rest of the emails within the campaign is consistent with the flow for the first email.
The above flow has the following limitations:
- Contacts get access to one asset at a time.
Note: PathFactory addresses this issue by allowing contacts to access all nurture campaign assets right from the first email link. - The flow assumes that contacts are ready to be nurtured according to marketer schedule. In reality, contacts are unlikely to wait for the next email to be sent to them at the same time next week and will instead look for content themselves online.
Note: PathFactory solves for this limitation by giving your contacts the option to self-nurture and consume all pieces of content in one single session. - Engagement is measured based on clicks. In reality, not all clicks are created equal: one click could result in the contact looking at an asset for 2 seconds, while another could spend minutes engaging with the same content.
Note: PathFactory tracks actual engagement time, providing you with accurate visibility on the level of engagement after the click.
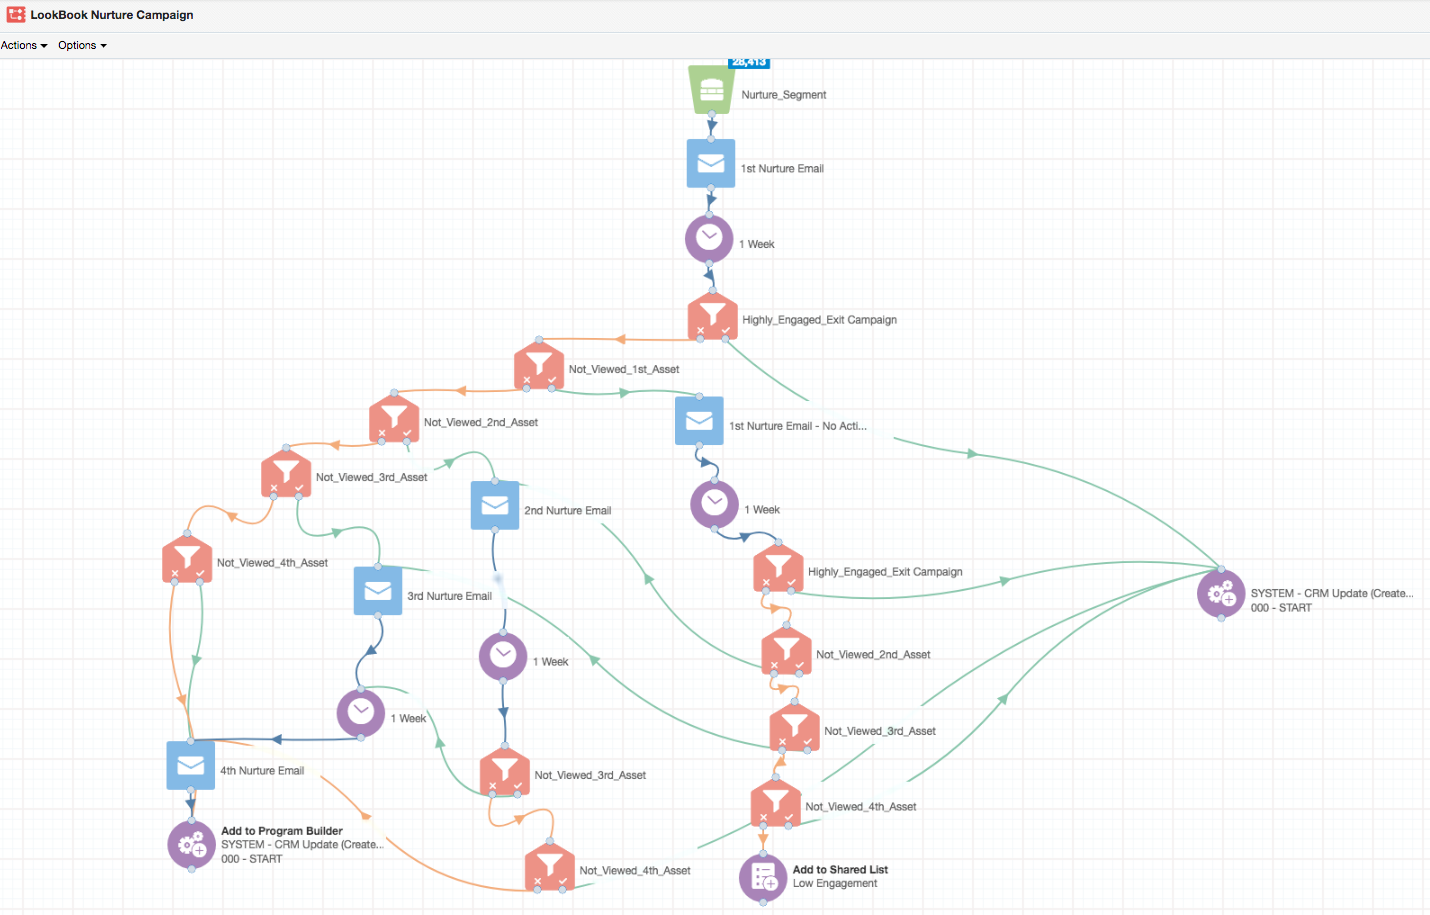
Redesigned to utilize PathFactory engagement data instead of email clicks as a measure of engagement, the campaign flow is altered as shown below.
In contrast with a traditional nurture Eloqua campaign, the main elements of the enhanced Eloqua campaigns are as follows:
- An initial email gets sent out to campaign members. However, instead of having a link to a single webpage or document as a CTA, the email will feature a link to a PathFactory content track instead.
- The PathFactory Content Track will have all the individual assets available in the content track – as opposed to the previous flow in which each of the assets were linked separately to an email in the campaign flow.
- This provides the recipients with the option to self-nurture and go through as many assets as they’d like in one single session – instead of waiting for next nurture email to be sent.
- This also enables those leads who are interested in your products/services to substantially accelerate their move down the buying funnel.
- After a waiting period of 1 week, Contacts are evaluated to determine their level of engagement with the email sent.
- A series of filters that utilize PathFactory engagement data are used to determine the level of engagement with the email.
- NoContacts are first evaluated against the “Highly_Engaged_Exit_Campaign” filter.
Note: The purpose of this filter is to quickly identify leads that have shown a high level of engagement with the overall content of the nurture campaign.
- We identify a highly-engaged lead as one who has met the engagement threshold on half or more of the number of the assets in the content track, and having viewed 75% of assets in the content track within the last week.
The video below shows the filter criteria: - Leads who are highly engaged are fast-tracked: they will not receive any additional emails from the campaign. They can exit the campaign. In the example campaign shown above, we are sending contacts who exit the campaign to CRM via the CRM update program. This is optional and contacts could go to any other step you deem appropriate instead.
- Leads who do not meet the conditions in the filter are evaluated against a sequence of filters that check whether the leads have not viewed the first asset, the second asset, the third asset, or the forth asset in the content track. Video below shows the filter criteria
When a lead is matched against one of the filters – example: if a lead is matched against “Not_Viewed_1st_Asset”, they are sent an email with a PathFactory link allowing them to start their journey with the content track right from the 1st asset. * Alternatively, if the lead is matched against “Not_Viewed_2nd_Asset”, they would be sent an email with a PathFactory link pointing directly to the second asset – a link to the asset that they have not viewed. - The flow after each email send is similar to that explained above. 1 Week Wait step after the email is sent. A series of filters to check whether there is any highly-engaged leads and what assets have not been viewed. When a lead is matched against one of the filters, they are sent an email that corresponds to the asset they have not viewed.
- We identify a highly-engaged lead as one who has met the engagement threshold on half or more of the number of the assets in the content track, and having viewed 75% of assets in the content track within the last week.
- NoContacts are first evaluated against the “Highly_Engaged_Exit_Campaign” filter.
- A series of filters that utilize PathFactory engagement data are used to determine the level of engagement with the email.
Adjusting The Frequency of Email Send in a Nurture Campaign Using PathFactory Engagement Data
You can also use PathFactory engagement data to adaptively change the frequency of nurture email sends to recipients.
Shown below is a Welcome Nurture campaign flow that utilizes PathFactory engagement data to determine how often should a contact receive a nurture email.
Welcome Nurture Campaign example
Campaign Elements
You can observe the following elements in the campaign:
From a content perspective, we are showing 4 emails.
- The first email “About_us” has a link to a content track with assets that provides information about PathFactory as a company. Our goal with this email is to provide new contacts in our database with better familiarity with PathFactory and the solution we provide.
- The second email “What_B2B_Marketers_Can_Learn_From_Digital_Publishers” allows us to share with our leads some of the best practices in content marketing. Similar to the first email, the content is put together into a single content track that contacts can access from a single link.
- The third email “How_to_Improve_Resource_Center_Performance” builds on the theme of the second email by providing contacts with more of the best practices around Resource Centers.
- After the contacts have gained some familiarity about our space and some of the challenges facing marketers, we start educating them on how PathFactory solves for these challenges “Self_Nurturing_Made_Easy_With_LookBookHQ”.
- Although we are showing 4 emails, your campaign flow could have more emails than that. Your campaign could also feature more educational content than we are showing.
Campaign Flow
PathFactory engagement data enhances the flow of the campaign in the following ways:
- Engagement data allows you to identify contacts that are highly engaged with the content. This allows you to identify such leads and greatly accelerate their move down the funnel by sending them more content to engage with on an accelerated schedule – an email every 3 days instead of the standard an email a week schedule.
- Engagement data also allows you to identify contacts that are not quite ready to engage with the content you sent. Such contacts are set on a slower send schedule – an email every 2 weeks, which reduces the subscription rate since such contacts are not sent emails are often.
- Engagement data still allows for contacts that show a moderate level of engagement to receive emails at the standard once a week cadence.
Campaign Filters
- The Highly Engaged filter identify contacts who scored 2 or more in the content track that was sent in the prior email.
- Example: Video below shows how the “About_us_Highly_Engaged?” filter is built
- The Average Engagement filter identifies contacts who score 1 in the content track that was sent in the prior email.
- Example: Video below shows how the “About_us_Average_Engagement?” filter is built.
Note: You may choose to build a third filter that identify contacts who have not visited the content track sent in the previous email.
-
These contacts could be placed on a very slow send schedule – example: one email per 3 weeks.
- Example: Video below shows how the “About_us_Average_Engagement?” filter is built.
Fast Moving Buyer Alerts in Eloqua
Fast Moving Buyer Alerts are a great way to let sales know about a hot lead.
What is an FMB Alert?
It’s an email alert that you set up in your MAP to send a lead’s details to an individual or group in sales; the alert is triggered by the lead’s engagement with your content.
Lead Details included in an FMB Alert:
- Name
- Address
- Organization
PathFactory Data you can include in the alert:
- What behavior made them a priority lead
- Which content assets the lead viewed
- How long did they spend with each content asset.
There are 4 steps to set up an FMB Alert:
- Set up a Visitor Activity Webhook in PathFactory
- Create a Fast Moving Buyer Alert Email in Eloqua
- Create a Processing Step in Eloqua to qualify Fast Moving Buyers and send the alert email
- Test the Fast Moving Buyer Alert
Step 1: Set up a Visitor Activity Webhook in PathFactory
A visitor activity webhook will pass PathFactory engagement data from PathFactory to Eloqua every time a visitor engages with a contact track.
| For help setting up a visitor activity webhook in PathFactory, see this article. |
We recommend you pass the following fields through your webhook:
| Field Name | Description |
| Email Address | Use the Eloqua Email Address field. Do NOT create a new email field |
| Experience Name | The name of the last PathFactory content track that the contact engaged with and on which the Activity was triggered. |
| Event Time | The actual date/time when the visitor finished engaging with all of your content tracks, recorded in your PathFactory install timezone. |
| Session Engagement Time | Total time the visitor spent engaging with all of the PathFactory content assets during the session combined. |
| Session Total Views | The total number of times the assets have been viewed. |
| Session Last Viewed Content Title | The public title of the last piece of content viewed in a session. |
| Session Last Viewed Content Source URL | Underlying URL of last viewed asset in the session. |
| Session Content Journey | The order of assets viewed during the session. The assets will be represented by their unique URL slugs in this format: [ContentAsset1][ContentAsset2][ContentAsset3] |
There are several different types of visitor activities and each one allows you to define criteria which need to be met for the visitor activity to fire. Most PathFactory customers use the Multiple Asset Engagement Activity Type, however you could also consider using the Engagement Score Activity Type.
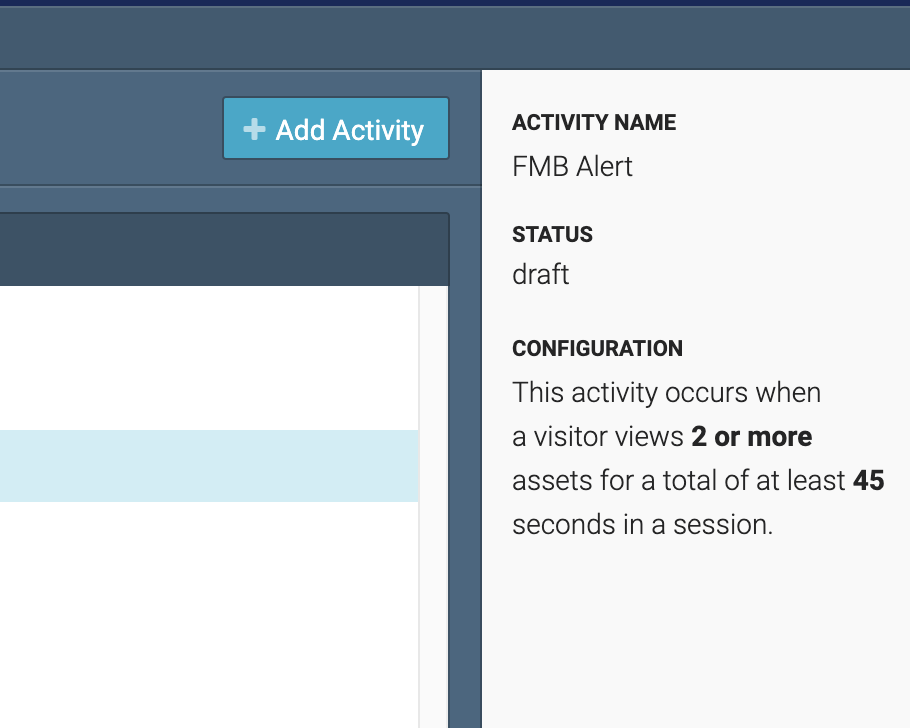
This is an example of a Multiple Asset Engagement Visitor Activity called FMB Alert where the threshold is 2 or more assets and a session duration of minimum of 45 seconds, which might make this binge content consumer of interest to your sales team.
| For a full list of possible fields PathFactory can send over to Eloqua, please see this article and add any desired fields to this list. If you leverage UTM parameters or other tracking parameters, additional fields may be added to this list. |
Step 2: Create an Eloqua Form Notification for the Fast Moving Buyer Alert
This step involves creating the email that will provide the engagement data of the prospect that viewed your content track. This email will be sent to the sales owner of the engaged prospect so that they can act on the email alert.
Below is a sample of an email that can be sent to contact owners of Fast Moving Buyers. You can customize the content of the email within the header. The rest of information provided in the email is dictated by Eloqua and the form submission data.

Step 2.1: Create your custom Eloqua Email Header
Create a new email header by navigating to Assets> Components > Email Header
An Eloqua form notification allows you to customize your message to your sales team within the Email header. You can include the first name, last name and company field merges along with any other field merges you deem appropriate.

Step 2.2: Create an Eloqua Form Notification and associate it to your newly created custom header
Navigate to Settings > Form Notifications (under Display Preferences) and create new Form Notification.
Provide name and customize a From & Reply-To if necessary.
Check off Customize Branding of Email content to select your newly created email header.

Step 3: Create a Processing Step in Eloqua to qualify Fast Moving Buyers and send the alert email
Once you have your notification created there are two ways to have the notification email trigger to an email address.
- Option A: Fast Moving Buyer alert in Eloqua to a static sales inbound email address
- Option B: Fast Moving Buyer alert in Eloqua to a dynamic email address of the contact’s sales owner
Because Option B only sends when a sales owner is provided in a query parameter (ie: outreach email), it is recommended that both options be configured to allow for a consistent FMB alert to be sent at all times. This allows for those who have an owner associated with them to quickly take action while still maintaining the ability to keep a pulse on visitors who arrive from other channels.
Option A: Fast Moving Buyer alert in Eloqua to a static sales inbound email address
This option allows for the notification to be sent to a dedicated email address. (eg: sales@company.com)
Step 3A.1: Navigate back to your PathFactory Webhook form and add a ‘Send Notification Email’ processing step. Enter the email address that you want the alert to be sent to. Update the subject line and select your newly created notification under ‘Notification Configuration’

Press Save and Test according to the Visitor Activity you set the Fast Moving Buyer alert to qualify on.
Option B: Fast Moving Buyer alert in Eloqua to a dynamic email address of the contact’s sales owner
This option allows for engagement data to be sent directly to the contact’s sales owner. The steps required to achieve this option are:
- Creation of Custom Sales Rep Email to reference which email addresses the alert should dynamically send to
- Mapping of new custom Sales Rep Email to PathFactory Webhook
- Configuration of PathFactory share URLs to use in Eloqua Emails that dynamically reference the Contact’s Sales Owner
- Addition of Custom External Code within PathFactory to strip the email address from the URL
- Add the ‘Send Notification Email’ Processing Step to your Webhook
Before setting up the Processing Step on the Webhook Form within Eloqua, you will need to create a custom field to hold the Sales Owner’s email, add the field to your webhook form, and add an additional Custom Field mapping to your PathFactory Visitor Activity webhook.
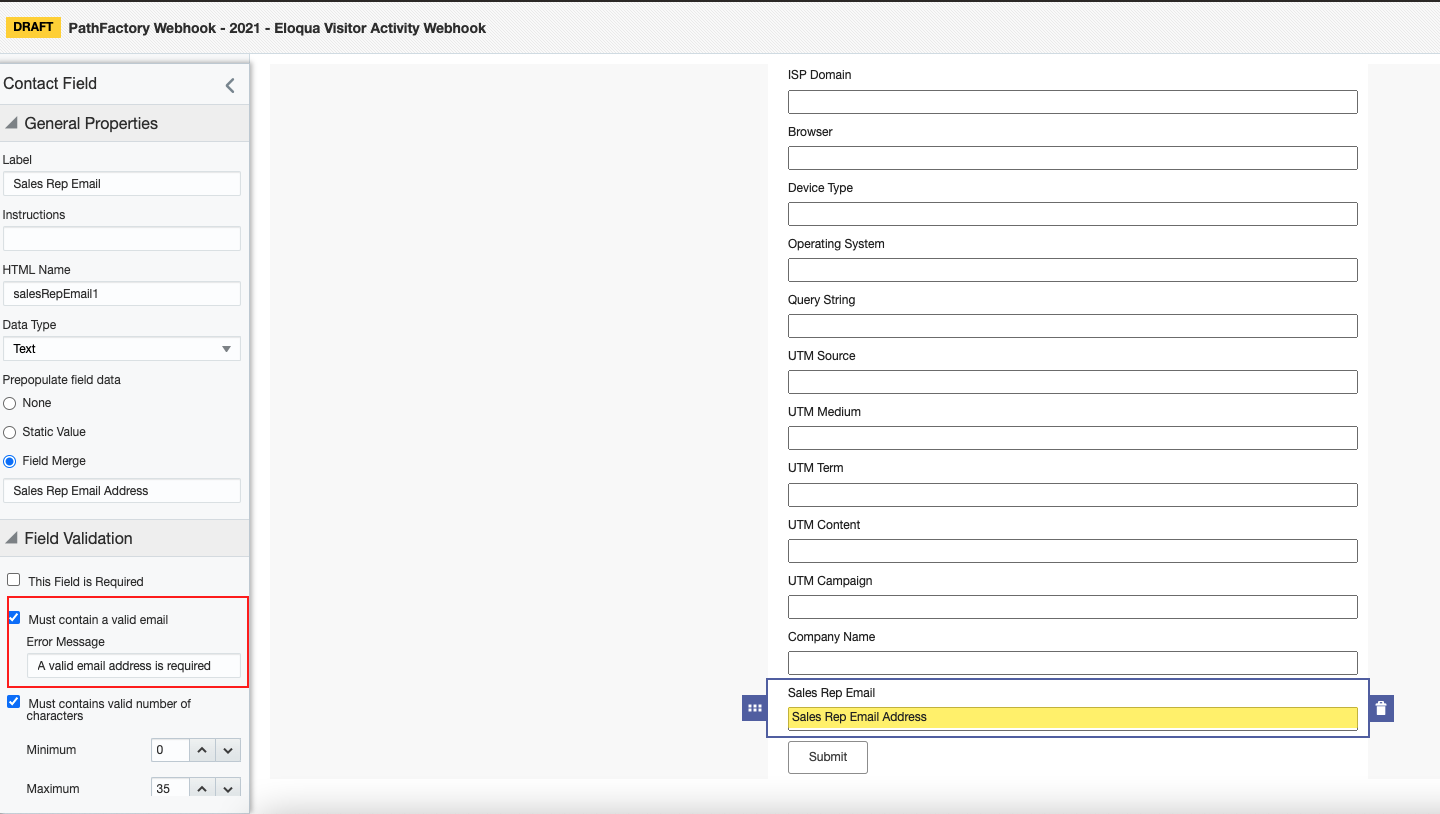
Step 3B.1: Creation of Custom Sales Rep Email to reference which email addresses the alert should dynamically send to
Below is a sample of how this field can be created within Eloqua. Please note: This field will likely need to be added to a CRM Sync, and will require you to have a dedicated field storing this info in an email address format.

Step 3B.2 Mapping of new custom Sales Rep Email to PathFactory Webhook
Once the field is created, ensure that that Field is added to the Webhook Form with valid email field validation turned on.
Then navigate to your Visitor Activity Webhook within PathFactory and add a new Custom Field with according to a defined query parameter in your PathFactory share URLs.
Below is an example configuration that we will reference later as we generate the PathFactory share URLs for your Eloqua emails. This can be customized as long as the key is updated throughout, but should be consistent throughout your instance.
- Key: salesRepEmail1
- Value: {{query.salesRepEmail1}}

Step 3B.3: Configuration of PathFactory share URLs to use in Eloqua Emails that dynamically reference the Contact’s Sales Owner
Create a new Field Merge that merges from Contact Fields, and select the Sales Rep Email field.

You will need to add this field merge to all PathFactory links being shared via the sales reps. This field merge will indicate the recipient’s sales owner’s email address
Beginning with an “Email Tracking Link” to a PathFactory Track, we will add an additional parameter. The initial tracking link should look something like this:
Add the following text to the end of the URL once you paste it into Eloqua (without the quotation marks) – “&salesRepEmail1=”
Click to Insert the Field Merge created earlier
The updated link should then look like:
Step3B.4: Addition of Custom External Code within PathFactory to strip the email address from the URL
In order to allow for a better visitor experience, a custom script should be added to your PathFactory pages to have the email address query parameter stripped from the URL each time a visitor clicks through.
In your PathFactory Instance, go to Gear Icon > External Code. Click Add External Code and name your code something like “Remove Sales Rep Email Parameter”
Paste the following code:
<script>
var repemail = “{{query.salesRepEmail1}}”;
function striprepemail() {
if(repemail && repemail !== ”) {
repemail=decodeURIComponent(salesRepEmail1);
var url = new URL(window.location);
url.searchParams.delete(salesRepEmail1);
window.top.history.pushState({}, ”, decodeURIComponent(url));
}
}
striprepemail();
</script>

Step3B.5: Add the ‘Send Notification Email’ Processing Step to your Webhook
In the “Choose how the recipient email address is selected” option, select “Use the value of a form field to select the email”
On the right dropdown, select the Sales Rep Email field added to the form in step 2 above
Update subject line and select your newly created notification under Notification Configuration and save

Press Save and Test according to the Visitor Activity you set the Fast Moving Buyer alert to qualify on.
Step 4: Test the Fast Moving Buyer Alert
Navigate to any PathFactory page ensuring that you are meeting the criteria of the Visitor Activity that you have set. For the example listed above you will need to land engage with at least 2 assets for more than 45 seconds.
In order to test Option B, you will need to send a test email to yourself using the URL incorporating the sales email field merge mentioned in Step 3B.3. Once you click into the link, you should not see the sales email within the URL. Ensure that you are still meeting the criteria of the Visitor Activity that was set.
Close the page and after 30 minutes you should see the webhook fire and the Fast Moving Buyer Alert in the inboxes of the email addresses indicated in the processing steps.